Product description
The tests that are included in the TEST KIT POTABLE WATER are the following:
- Chlorine LR (50 tests)
- Total Hardness (1 – 50 tests, depending on the number of tablets used per test)
- Turbidity (unlimited number of tests)
- Conductivity/TDS (unlimited number of tests)
- Microbial monitoring using TTC/E.coli dip slides (10 tests)
- Microbial monitoring using TTC/Pseudomonas dip slides (10 tests)
- pH (unlimited number of tests)
The above mentioned tests are further explained in following paragraphs.
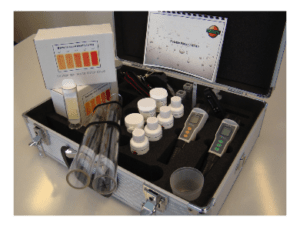
The test kit contains:
- Plastic case
- Chlorine LR by comparator (0 to 4 ppm with DPD No 1 & DPD No 3 tablets, 2 x 10 ml plastic test cells and tablet crusher)
- pH (6 to 10) by test strips (100)
- Conductivity/TDS by EC1 meter with conductivity standard solution
- Total Hardness by tablet count with shaker/dilution tube
- 10 x dip slides for E.coli/coliforms (D005)
- 10 x dip slides for Pseudomonas species (D007)
- 26 inch turbidity tube (5 to 300 NTU)
- Stick thermometer for temperature monitoring
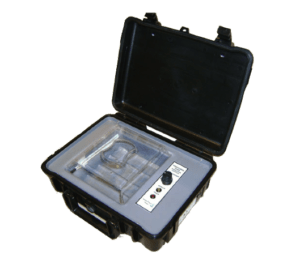
Also supplied, in separate case: Discovery incubator
INCUBATION OF DIP SLIDE TESTS
Dip slides are used to establish and assess if the conditions present in a water system encourage bacteria to multiply. Once the sample has been collected the dip slide requires incubation at 30°C for 48 hours to obtain a true result and consistently time after time.
A dip slide incubator is a critical element of microbiological monitoring. A lower temperature can mean the bacteria will grow more slowly and give a false low reading. If your reading is artificially low then the treatment engineer will consider that no action is necessary and the bacteria will be free to multiply and increase the risk to public health. Conversely, if the temperature is high then the growth may be accelerated giving a false positive. This false high bacteria count can lead to unnecessary and expensive extra cleaning and treatment processes.
Approved code of practice and guidance for the control of legionella bacteria in water systems requires weekly monitoring of microbiological activity.
DISCOVERY INCUBATOR
The Discovery MX10 is specifically designed for dip slides (but is easily capable of several 100 mm Petri dishes) and applications on site. The efficient design helps minimise power usage and the robust ABS case is ideal for a life at sea.
The MX10 is supplied ready for mains or 12 volt as standard and features our world standard plug & power adaptor – all ready to go. The tested MX solid state temperature control technology and heat reservoir chassis guarantee superb heat distribution without any fans or moving parts, only 1.2 kg in total weight.
|
Description |
Info |
|
Discovery 8 slide incubator 12V / 240V |
ea. |
|
Dip slides capacity: |
8 |
|
Power supply: |
12 / 240 Volt |
|
Temperature range: |
Ambient + 5 to 45ºC |
|
Temperature accuracy: |
± 0.5ºC |
|
External dimensions: |
27 x 21 x 10 cm |
|
Weight: |
1.2 kg |
|
Guarantee: |
2 years |
Some of the reagents required for the tests are classed as hazardous and therefore as a minimum YOU MUST WEAR the following:
- GLOVES (latex, rubber or plastic)
- SAFETY GOGGLES (spectacles) or face mask
In addition please note and observe the Risk and Safety (R&S) phrases on each reagent container, and follow the handling guidelines as instructed.
GENERAL NOTES
- Avoid contact with skin or eyes.
- In the case of contact with skin or eyes rinse off immediately with plenty of running water and seek medical attention if the irritation persists.
- Do not ingest the product.
- In case of ingestion, wash the mouth out thoroughly with water and seek medical attention.
Chlorine LR
Determination of Free, Total & Combined Chlorine (0 – 4.0 mg/l)
- Rinse both cells with sample and empty. Fill a cell with sample and place in the left side of the comparator to act as the blank.
- To second cell add 1 x DPD No 1 tablet, crush fill and place in right side of the comparator, see note 2.
- Rotate the disc until colour match is obtained and record reading, see note 3.
NOTES:
- With the addition of only a DPD No1 tablet, the method determines the level of Free Chlorine.
- To determine Total Chlorine : After completing the Free Chlorine test, record the result and then add 1 x DPD No 3 tablet to the same cell. Allow 2 minutes reaction time and then place in right hand side of comparator and then read the result. This is now Total Chlorine.
- To determine Combined Chlorine: Deduct the level of Free Chlorine from the Combined Chlorine.
Chlorine Free as Cl2 mg/l (ppm) = disc reading
Total Hardness tablet count
Determination of Total Hardness by tablet count. Range 0 – 1200 ppm
- Take 25 ml, 50 ml, or 100 ml sample depending on the range expected (see notes).
- Add Total Hardness Tablets one at a time.
- Continue adding till the red colour changes to blue.
- Record number of tablets and calculate result from reference data.
- To calculate your results multiply the number of tablets added to sample by the factor:
LR Total Hardness (100 ml sample) as CaCO3 (mg/l) ppm = (Number of tablets x 20) – 10
MR Total Hardness (50 ml sample) as CaCO3 (mg/l) ppm = (Number of tablets x 40) – 20
HR Total Hardness (25 ml sample) as CaCO3 (mg/l) ppm = (Number of tablets x 80) – 40
REFERENCE DATA
For Low Range Hardness use 100 ml Range 0 – 250 ppm
For Mid Range Hardness use 50 ml Range 0 – 500 ppm
For High Range Hardness use 25 ml Range 0 – 1200 ppm
Turbidity and suspended solids
- The turbidity test is designed to give a measure of the suspended solids content of water. It is also useful in following day to day variation in the quality of different water types.
- The turbidity test uses a specially calibrated plastic tube and provides the simplest possible method of performing this important test.
- The tube is graduated at 30 to 500 turbidity units on the 13 inch tube.
- A double length tube of 26 inches with additional graduations from 5 to 25 turbidity units is optionally available.
TEST PROCEDURE
- Hold the tube vertically over a white surface and view downwards.
- Gradually pour in the water sample until the black cross is just no longer visible.
- Read off the graduation corresponding to the height of the sample in the tube. This represents the turbidity of the effluent in Jackson Turbidity Units (JTU).
- For waters the graduations may also be taken as being approximately equivalent to the Suspended Solids Content as milligrams per litre.
The tube should be rinsed after each use. Any staining may be removed by the use of a household detergent. For potable waters the black cross should be visible when the double tube (26 inch) is totally filled with water.
Dip slides for microbial monitoring of water
Use of dip slides for TTC/E.coli & coliforms (D005) & TTC/Pseudomonas (D007)
D005 are specific for TVC (total viable bacteria) and E.coli & coliforms.
D007 are specific for TVC (total viable bacteria) and Pseudomonas species.
METHOD OF USE
- Remove the dip slide from the clear plastic vial being careful not to touch the surface.
- Add sample water to fill the vial.
- Re-insert the dip slide into the vial fully submerging the dip slide into the sample water.
- Swirl the sample gently, then remove the dip slide from the vial and discard the water sample.
- Place the dip slide back into the vial and immediately incubate at 30ºC for 48 hours.
INTERPRETATION OF RESULTS
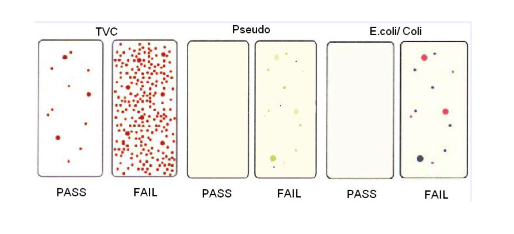
After incubation at 30ºC for 48 hours, dip slides should be compared to the chart and recorded. The TVC side (red growth) of the dip slide should not show any growth exceeding the first picture. Any large inconsistencies or contamination above this level will require action. The opposite side of both dip slides should be entirely clear. If there are any light pink, blue or green growths immediate action is required.

EC1 – conductivity / TDS / salinity / temperature meter
Conductivity range: 0 ~ 2000µS / 2.00 ~ 20.00 mS / Accuracy 1 µS / 0.01 mS
TDS range: 0 ~ 1300 ppm / 1.30 ~ 13.00 ppt / Accuracy 1 ppm / 0.01 ppt
Salinity range: 0 ~ 1000 ppm / 1.00 ~ 12.00 ppt / Accuracy 1 ppm / 0.01 ppt
Temperature range: 0 ~ 90°C / Accuracy ± 0.2°C
ATC included. Auto shut off after 10 minutes. Batteries 2x CR2032
PREPARATION
Remove the protective cap from the meter and rinse the electrode with clean water, then wipe dry.
Press the yellow power CAL button to turn the meter on. Do not touch or wipe the surface of inner black sensor of conductivity cell.
CALIBRATION
Check that the COND icon shows in the LCD display.
Dip the electrode into standard solution 1413 μS/cm and stir gently then wait for the display to stabilise.
Press and hold the yellow power CAL button to enter calibration mode and hold until the display shows CAL and then flashes 1413. When the display stops flashing and indicates SA then END calibration is finished and the meter returns to measurement mode.
Note: Calibration by 12.88 mS/cm standard solution should be used if you are measuring high conductivity values. If the meter does not read 0 μS/cm while in air, then calibrate the probe in air (dry) to obtain a true zero reading.
MEASUREMENT
After calibration, rinse the conductivity cell with clean water and wipe it dry.
Dip the electrode into the sample and stir gently until a stable reading is obtained.
Press MODE button to select the desired measurement mode. The unit will display the last unit of measurement in use before it was turned off. The unit scrolls in a standard sequence, right display is TDS, middle display is SALT and left display is COND.
The unit will auto range to μS/cm or mS/cm or ppm or ppt.
If the display reads “—–” it is outside the measuring range.
Press and hold the MODE button to switch between °C or °F.
When measuring TDS, ensure that the pH of the water sample is below 8.3. To do so you must neutralise the sample before measurement by adding 2 drops of PA1 or Alkalinity Neutralising Solution. If the solution turns pink/red, add drops of 20% Acetic Acid or further drops of Alkalinity Neutralising Solution until sample turns back to colourless.
FACTORY RESET PROCEDURE
1. Turn power ON.
2. Press and hold button HIM and MODE simultaneously, then turn power off.
PH1 - pH / temperature meter
pH Range pH: -2 ~ 16.00 / Accuracy ± 0.01 + 1 digit
Temperature range: 0 ~ 90°C / Accuracy ± 0.2°C
ATC included. Auto shut off after 10 minutes. Batteries 2 x CR232
PREPARATION
Remove the protective cap and unscrew the inner cap from the meter and rinse the electrode with clean water, then wipe dry.
Press the green power CAL button to turn the meter on. Always replace protective caps after usage. Ensure inner cap has pH 4 inside for electrode storage.
SINGLE POINT CALIBRATION
Check that the PH icon shows in the LCD display.
Dip the electrode into buffer 7.0 and stir gently, then wait for the display to stabilise.
Press and hold the green power CAL button to enter calibration mode and hold until the display shows CAL and then flashes 7.00. When the display stops flashing and indicates SA then END calibration is finished and the meter returns to measurement mode.
TWO OR THREE POINT CALIBRATION
After rinsing the electrode in clean water wipe dry.
Then dip the electrode into bu er 4.0 and stir gently, then wait for the display to stabilise.
Press and hold the green power CAL button to enter calibration mode and hold until the display shows CAL and then flashes 4.00. When the display stops flashing and indicates % then SA then END calibration is finished and the meter returns to measurement mode.
After slope calibration pH 4 or pH 10, the display will indicate percentage of slope to show status of the electrode.
If the % is below 70% or above 130%, the electrode must be replaced. A slope of 100% is ideal.
Notes: If the icon SA does not appear, then the calibration has failed.
When doing a 2 or 3 point calibration, use pH 7 first, followed by pH 4 and then pH 10.
MEASUREMENT
After calibration, rinse the electrode with clean water and wipe it dry.
Dip the electrode into the sample and stir gently until a stable reading is obtained. After reading, rinse in clean water and replace both caps.
Features & Benefits
- Easy to use, compact and convenient design
- Testing Chlorine LR
- Measuring Total Hardness
- Testing turbidity
- Testing conductivity/TDS
- Microbial monitoring using TTC/E.coli and TTC/Pseudomonas dip slides
- Testing pH
- Comes with Discovery Incubator


